
- Thu Jan 18, 2018 11:00 pm
#812899
Follow this tutorial to install ProcessMaker 3 in Slackware 14.2 and later. Slackware is a conservative community Linux distribution that aims for design, stability and simplicity.
Before installing ProcessMaker, check the Installation Requirements to see whether your server meets the necessary hardware and software requirements.
Requirements:
This guide assumes that a full Slackware installation is ready and that the network has already been configured.
Step 1: Installing Apache, MySQL and PHP
Warning: ProcessMaker is not compatible with MySQL STRICT mode, which is enabled by default in MySQL 5.7. Read the Turning Off MySQL STRICT Mode section to learn how to disable it. Since MySQL 5.7 is NOT part of any official ProcessMaker stack, the application has not been tested entirely in this version of MySQL. Therefore, ProcessMaker may not run correctly even if STRICT mode is disabled.
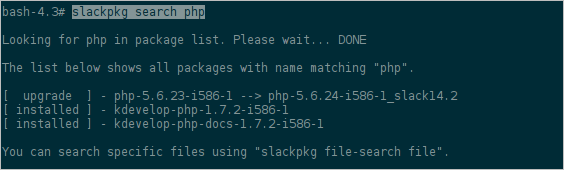
If a full installation was performed, Slackware 14.2 comes with the following versions already installed:
 3.0SlackwarePHPSearch.png (15.51 KiB) Viewed 7965 times
If the Apache package is not installed, write the following command to first download it.
3.0SlackwarePHPSearch.png (15.51 KiB) Viewed 7965 times
If the Apache package is not installed, write the following command to first download it.
 3.0SlackwareApacheDownload.png (10.53 KiB) Viewed 7965 times
Once downloaded, install the package executing the following command:
3.0SlackwareApacheDownload.png (10.53 KiB) Viewed 7965 times
Once downloaded, install the package executing the following command:
 3.0SlackwareApacheInstall.png (10.22 KiB) Viewed 7965 times
To start the httpd server and to be sure it starts each time at boot, set the /etc/rc.d/rc.httpd file as executable and start it with the following command.
3.0SlackwareApacheInstall.png (10.22 KiB) Viewed 7965 times
To start the httpd server and to be sure it starts each time at boot, set the /etc/rc.d/rc.httpd file as executable and start it with the following command.
Step 2: Configure PHP Settings
Restrictions about PHP
Please take notice of the following PHP restrictions:
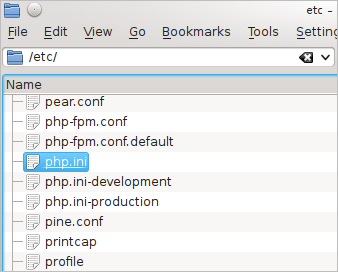
Open the PHP's configuration file php.ini located at /etc/ with your favorite editor.
 3.0SlackwarePHPini.png (26.42 KiB) Viewed 7965 times
Search for the following lines and edit them using the following configurations:
3.0SlackwarePHPini.png (26.42 KiB) Viewed 7965 times
Search for the following lines and edit them using the following configurations:
 3.0SlackwarePHPiniModules.png (62.27 KiB) Viewed 7965 times
Save the changes and close the file.
3.0SlackwarePHPiniModules.png (62.27 KiB) Viewed 7965 times
Save the changes and close the file.
Step 3: Download & Extract ProcessMaker
Go to ProcessMaker's SourceForge page and download a recent tarball of ProcessMaker, which should be named processmaker-X.X.X.X-community.tar.gz.
After the download has finished, decompress the tarball in the directory where ProcessMaker will be installed. ProcessMaker can be installed in any directory which is not publicly accessible to the internet (so do NOT install it in /var/www), but it is generally installed in /opt, since it is an optional program which doesn't come from the standard repositories:
 3.0SlackwarePMlscheckfiles.png (6.31 KiB) Viewed 7965 times
Set file permissions
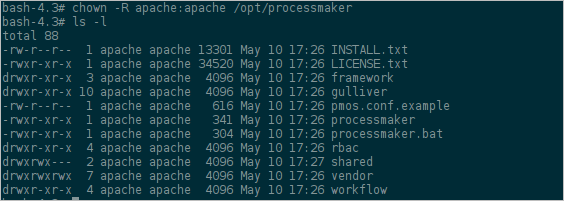
Then, issue the following commands as the "root" user so that ProcessMaker can access the necessary files when run by the Apache server:
 3.0SlackwarePMPermissionsReview.png (15.99 KiB) Viewed 7965 times
Step 4: MariaDB Configuration
3.0SlackwarePMPermissionsReview.png (15.99 KiB) Viewed 7965 times
Step 4: MariaDB Configuration
Warning: ProcessMaker is not compatible with MySQL STRICT mode which is turned on by default in MySQL 5.7. Please follow the Turning off MySQL STRICT Mode section to disable it.
As mentioned before, Slackware comes with MariaDB as the default database service. Before starting the MariaDB Service, it is neccesary to disable the "-skip-networking" option by opening the mysqld script located at /etc/rc.d/rc.mysqld.
 3.0MariaDBBeforeSecureSKIPrcmysqld.png (23.48 KiB) Viewed 7965 times
Search the following line and comment it out of the mysqld script (insert"#" at the beginning of the line).
3.0MariaDBBeforeSecureSKIPrcmysqld.png (23.48 KiB) Viewed 7965 times
Search the following line and comment it out of the mysqld script (insert"#" at the beginning of the line).
 3.0MariaDBBeforeSecureSKIPCommented.png (43.94 KiB) Viewed 7965 times
Then, install the database system tables with the following command to get the right permissions.
3.0MariaDBBeforeSecureSKIPCommented.png (43.94 KiB) Viewed 7965 times
Then, install the database system tables with the following command to get the right permissions.
 3.0MariaDBSecure00.png (13.58 KiB) Viewed 7965 times
]
3.0MariaDBSecure00.png (13.58 KiB) Viewed 7965 times
]
Here it is necessary to enter root password:
 3.0MariaDBSecure03.png (3.29 KiB) Viewed 7965 times
In the next part, it is possible to change the root password:
3.0MariaDBSecure03.png (3.29 KiB) Viewed 7965 times
In the next part, it is possible to change the root password:
 3.0MariaDBSecure01.png (4.45 KiB) Viewed 7965 times
Then, remove anonymous users by choosing "Y":
3.0MariaDBSecure01.png (4.45 KiB) Viewed 7965 times
Then, remove anonymous users by choosing "Y":
 3.0MariaDBSecure05.png (7.6 KiB) Viewed 7965 times
In this part, the prompt will ask about disabling root login. Answer No because, ProcessMaker is going to run as a Virtual Host. Therefore, the remoto login should be enabled.
3.0MariaDBSecure05.png (7.6 KiB) Viewed 7965 times
In this part, the prompt will ask about disabling root login. Answer No because, ProcessMaker is going to run as a Virtual Host. Therefore, the remoto login should be enabled.
 3.0MariaDBSecure04.png (10.94 KiB) Viewed 7965 times
Then, it is possible to remove the default "Test" database:
3.0MariaDBSecure04.png (10.94 KiB) Viewed 7965 times
Then, it is possible to remove the default "Test" database:
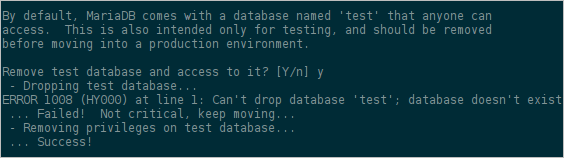 3.0MariaDBSecureTestDatabaseRemove.png (15.2 KiB) Viewed 7965 times
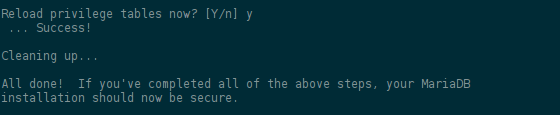
Finally, reload privileges tables:
3.0MariaDBSecureTestDatabaseRemove.png (15.2 KiB) Viewed 7965 times
Finally, reload privileges tables:
 3.0MariaDBSecureErrorNoSocket.png (9.92 KiB) Viewed 7965 times
MySQL Possible Configuration Issues
3.0MariaDBSecureErrorNoSocket.png (9.92 KiB) Viewed 7965 times
MySQL Possible Configuration Issues
Can't connect to server through socket
This error is usually because the database was created first with wrong permissions.
 3.0MariaDBSecurePrivilegeTables.png (9.18 KiB) Viewed 7965 times
To resolve this, first, try removing the database directory:
3.0MariaDBSecurePrivilegeTables.png (9.18 KiB) Viewed 7965 times
To resolve this, first, try removing the database directory:
If MariaDB doesn't have a root password, set one for better security with the following command:
Step 5: Apache Configuration
First, remove the apache welcome page with the following command:
 3.0SlackwareApachehttpdListen80.png (16.89 KiB) Viewed 7965 times
Uncomment the following modules (remove the # symbol at the beginning of each line):
3.0SlackwareApachehttpdListen80.png (16.89 KiB) Viewed 7965 times
Uncomment the following modules (remove the # symbol at the beginning of each line):
 3.0SlackwareApachehttpdconf.png (25.01 KiB) Viewed 7965 times
For example:
To make the server accept connections on both port 80 and port 8000, on all interfaces.
Uncomment the following line (remove the # symbol) to enable Virtual Hosts.
 3.0SlackwareApachehttpdconfVHinclude.png (35.72 KiB) Viewed 7965 times
To enable PHP, do not forget to uncomment the following line:
3.0SlackwareApachehttpdconfVHinclude.png (35.72 KiB) Viewed 7965 times
To enable PHP, do not forget to uncomment the following line:
 3.0SlackwareApachehttpdIncludemodPHP.png (11.63 KiB) Viewed 7965 times
Add index.php next to "index.html" in the following line:
3.0SlackwareApachehttpdIncludemodPHP.png (11.63 KiB) Viewed 7965 times
Add index.php next to "index.html" in the following line:
 3.0SlackwareApachePmosconf.png (26.79 KiB) Viewed 7965 times
Save the changes and close the file.
3.0SlackwareApachePmosconf.png (26.79 KiB) Viewed 7965 times
Save the changes and close the file.
Now, open the sample ProcessMaker configuration file pmos.conf.example located at /opt/processmaker and copy the content:
 3.0SlackwareApachehttpdDirectoryIndex.png (9.87 KiB) Viewed 7965 times
Then, search the file httpd-vhosts.conf located at /etc/httpd/extra.
3.0SlackwareApachehttpdDirectoryIndex.png (9.87 KiB) Viewed 7965 times
Then, search the file httpd-vhosts.conf located at /etc/httpd/extra.
 3.0SlackwareApachehttpdvhostsconf.png (36.1 KiB) Viewed 7965 times
Open it, and paste the content of the pmos.conf file inside the httpd-vhosts.conf file.
3.0SlackwareApachehttpdvhostsconf.png (36.1 KiB) Viewed 7965 times
Open it, and paste the content of the pmos.conf file inside the httpd-vhosts.conf file.
The content pasted is similar to the following example, replace your_ip_address and your_processmaker_domain with the IP address or domain name used by your ProcessMaker server:
If your DNS or /etc/hosts has a defined domain for ProcessMaker, then use that domain for your_processmaker_domain. Otherwise, use the same IP address for your_processmaker_domain as was used for your_ip_address. For more information, see the Apache Virtual Hosts Documentation.
Note: It is also possible to define the virtual host for ProcessMaker directly in the Apache configuration by inserting the above VirtualHost definition in the file /etc/httpd/conf/httpd.conf.
Example 1:
ProcessMaker is installed in the /opt/processmaker directory and is running on a server at the address 192.168.1.100:
ProcessMaker is installed in the /user/fred directory on your local machine at port 8080 with an dynamic IP assigned by DHCP:
ProcessMaker is installed in the /opt/pm3.0.1.7 directory at the IP address 123.45.67.89 and the domains www.example.com and any variant of X.example.com:
After editing the httpd-vhosts.conf file, it is necessary to restart the Apache web server to use the new configuration:
Once all ProcessMaker configurations were set up, open a web browser and enter the IP address (and port number if not using the default port 80) where ProcessMaker is installed. For instance, if ProcessMaker is installed at the address 192.168.10.100, then go to: http://192.168.10.100 or if it is installed locally at port 8080, go to: http://127.0.0.1:8080
Then follow the steps in the Installation Wizard in the web browser to complete the installation of ProcessMaker.
Step 8: Additional Configuration
Additional aspects of ProcessMaker may need to be configured. See Additional Server Configuration and the Administration section of the wiki. Most installations of ProcessMaker need to configure the following:
Setting the Time Zone
The default time zone for the ProcessMaker server can be set by logging into ProcessMaker with the "admin" user and going to Admin ] Settings ] System and setting the Time Zone. Another way to set the time zone is edit the env.ini configuration file.
Configuring Email
If planning on sending out email notifications or enabling users to recover forgotten passwords, then see Email - Settings to configure ProcessMaker to use an email server.
Execution of cron.php
If planning on using email notifications or timer events, then the server running ProcessMaker has to be configured to periodically execute the cron.php file. See Executing Cron Scripts.
Errors during Installation
If an error occurs during the installation, check the installation log file:
<install-directory>/shared/log/install_log.log
Depending on the errors found in the installation log file, check the following files:
The Apache configuration file:
/etc/httpd/conf/httpd.conf
The ProcessMaker web site configuration file for Apache:
/etc/httpd/conf.d/pmos.conf
The PHP configuration file:
/etc/php.ini
The MySQL configuration file:
/etc/my.cnf
The ProcessMaker configuration file where components are installed:
<install-directory>/workflow/engine/config/paths_installed.php
The ProcessMaker configuration file for database connections:
<install-directory>/shared/sites/workflow/db.php
The ProcessMaker redirection to login screen:
<install-directory>/processmaker/workflow/public_html/index.html
If the following error appears at the login screen:
 ErrorIDNotWorkspace.png (1.51 KiB) Viewed 7964 times
This error indicates that the installer was unable to access the MySQL databases to install the translations. Make sure that the MySQL port (which is 3306 by default) isn't blocked by a firewall and MySQL is configured to accept connections from the server running ProcessMaker.
ErrorIDNotWorkspace.png (1.51 KiB) Viewed 7964 times
This error indicates that the installer was unable to access the MySQL databases to install the translations. Make sure that the MySQL port (which is 3306 by default) isn't blocked by a firewall and MySQL is configured to accept connections from the server running ProcessMaker.
If having other issues, please ask for help on our ProcessMaker forum.
Before installing ProcessMaker, check the Installation Requirements to see whether your server meets the necessary hardware and software requirements.
Requirements:
-
[*]ProcessMaker v 3.0.1.8, v.3.0.2, or v.3.0.4
[*]Slackware v. 14.2 (latest version)
This guide assumes that a full Slackware installation is ready and that the network has already been configured.
Step 1: Installing Apache, MySQL and PHP
Warning: ProcessMaker is not compatible with MySQL STRICT mode, which is enabled by default in MySQL 5.7. Read the Turning Off MySQL STRICT Mode section to learn how to disable it. Since MySQL 5.7 is NOT part of any official ProcessMaker stack, the application has not been tested entirely in this version of MySQL. Therefore, ProcessMaker may not run correctly even if STRICT mode is disabled.
If a full installation was performed, Slackware 14.2 comes with the following versions already installed:
-
[*]Apache 2.4.20
[*]PHP 5.6.23
[*]MariaDB 10.0.26
Code: Select all
slackpkg search PACKAGE_NAMECode: Select all
A dialog will be displayed to select an Apache version.
slackpkg download httpdCode: Select all
slackpkg install httpdCode: Select all
MariaDB 10.0.26 is already installed as the default database server along with PHP version 5.6.23 when the Slackware 14.2 installation was performed.chmod 0744 /etc/rc.d/rc.httpd
/etc/rc.d/rc.httpd startStep 2: Configure PHP Settings
Restrictions about PHP
Please take notice of the following PHP restrictions:
-
[*]ProcessMaker does not support PHP 7.
[*]In some hosted servers the [url=http://www.php.net/manual/en/function.get-headers.php]get_headers[/url] and [url=http://www.php.net/manual/en/function.apache-request-headers.php]apache_request_headers[/url] functions may be disabled, this will cause ProcessMaker's API doesn't work properly since the REstler library uses those functions. Make sure to have those functions enabled.
Code: Select all
Configuring PHPerror_reporting = E_ALL & ~E_DEPRECATED & ~E_STRICT
display_errors = Off
Open the PHP's configuration file php.ini located at /etc/ with your favorite editor.
Code: Select all
Next, uncomment the following extensions (remove the ; symbol at the beginning of each line):
short_open_tag = On
memory_limit = 512M
error_reporting = E_ALL & ~E_DEPRECATED & ~E_STRICT
display_errors = Off
post_max_size = 24M
upload_max_filesize = 24M
Code: Select all
extension=php_curl.dll
extension=php_gd2.dll
extension=php_ldap.dll
extension=php_mbstring.dll
extension=php_mysql.dll
extension=php_mysqli.dll
extension=php_openssl.dll
extension=php_pdo_mysql.dll
extension=php_soap.dll
Step 3: Download & Extract ProcessMaker
Go to ProcessMaker's SourceForge page and download a recent tarball of ProcessMaker, which should be named processmaker-X.X.X.X-community.tar.gz.
After the download has finished, decompress the tarball in the directory where ProcessMaker will be installed. ProcessMaker can be installed in any directory which is not publicly accessible to the internet (so do NOT install it in /var/www), but it is generally installed in /opt, since it is an optional program which doesn't come from the standard repositories:
Code: Select all
Verify that ProcessMaker was correctly decompressed:tar -C /opt/ -xzvf processmaker-X.X.X.X-community.tar.gz Code: Select all
The processmaker directory should contain the following content:
ls /opt/processmakerSet file permissions
Then, issue the following commands as the "root" user so that ProcessMaker can access the necessary files when run by the Apache server:
Code: Select all
By default the Apache service runs as the user apache. Therefore, the ownership of the ProcessMaker directory must belong to apache, so that Apache can read and write data. The -R makes the ownership changes recursive (apply to all files and directories within /opt/processmaker).cd /opt/processmaker
chmod -R 770 shared workflow/public_html gulliver/js gulliver/thirdparty/html2ps_pdf/cache
cd workflow/engine/
chmod -R 770 config content/languages plugins xmlform js/labels
Code: Select all
After these changes, verify the permissions and owner of the processmaker directory with the command chown -R apache:apache /opt/processmaker
Code: Select all
.
ls -lWarning: ProcessMaker is not compatible with MySQL STRICT mode which is turned on by default in MySQL 5.7. Please follow the Turning off MySQL STRICT Mode section to disable it.
As mentioned before, Slackware comes with MariaDB as the default database service. Before starting the MariaDB Service, it is neccesary to disable the "-skip-networking" option by opening the mysqld script located at /etc/rc.d/rc.mysqld.
Code: Select all
SKIP="--skip-networking"Code: Select all
Start the MariaDB's service "mysqld" running the following command:
mysql_install_db --user=mysqlCode: Select all
Set a password for the MariaDB root user with the following command.
chmod +x /etc/rc.d/rc.mysqld
/etc/rc.d/rc.mysqld startrc.mysqldCode: Select all
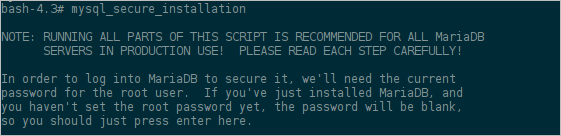
Finally, use the mysql_secure_installation command to set up a secure database environment. Login as the "root" user and issue the following command:
'/usr/bin/mysqladmin' -u root password 'pAsSw0rD'Code: Select all
Follow the wizard to secure MySQL:
mysql_secure_installationHere it is necessary to enter root password:
Can't connect to server through socket
This error is usually because the database was created first with wrong permissions.
Code: Select all
Then, recreate it with the right permissions, change directly its permissions and start the mysqld daemon with the dedicated init script.
rm -fR /var/lib/mysql Code: Select all
Setting the root Passwordmysql_install_db --user=mysql
chmod +x /etc/rc.d/rc.mysqld
/etc/rc.d/rc.mysqld start
If MariaDB doesn't have a root password, set one for better security with the following command:
Code: Select all
If you have forgotten the root password, see these instructions to reset it.'/usr/bin/mysqladmin' -u root password 'pAsSw0rD'Step 5: Apache Configuration
First, remove the apache welcome page with the following command:
Code: Select all
Edit the Apache file httpd.conf located at /etc/httpd/httpd.conf
rm -f /etc/httpd/conf.d/welcome.confCode: Select all
By default, the httpd.conf file is configured to listens to all addresses on the machine on port 80. However, it may need to be specified to listen on specific ports, or only on selected addresses depending on your server.
LoadModule authnz_ldap_module lib/httpd/modules/mod_authnz_ldap.so
LoadModule deflate_module lib/httpd/modules/mod_deflate.so
LoadModule expires_module lib/httpd/modules/mod_expires.so
LoadModule ldap_module lib/httpd/modules/mod_ldap.so
LoadModule rewrite_module lib/httpd/modules/mod_rewrite.so
LoadModule ssl_module lib/httpd/modules/mod_ssl.so
LoadModule vhost_alias_module lib/httpd/modules/mod_vhost_alias.so
For example:
To make the server accept connections on both port 80 and port 8000, on all interfaces.
Code: Select all
To make the server accept connections on port 80 for one interface, and port 8000 on another, use:
Listen 80
Listen 8000
Code: Select all
Listen 192.0.2.1:80
Listen 192.0.2.5:8000
Uncomment the following line (remove the # symbol) to enable Virtual Hosts.
Code: Select all
Include /etc/httpd/extra/httpd-vhosts.confCode: Select all
Include /etc/httpd/mod_php.confNow, open the sample ProcessMaker configuration file pmos.conf.example located at /opt/processmaker and copy the content:
The content pasted is similar to the following example, replace your_ip_address and your_processmaker_domain with the IP address or domain name used by your ProcessMaker server:
Code: Select all
Replace your_ip_address with the IP number or domain name of the server running ProcessMaker. If only planning on running and accessing ProcessMaker on your local machine, then use the IP address "127.0.0.1". If using ProcessMaker on a machine whose IP address might change (such as a machine whose IP address is assigned with DHCP), then use *, which represents any IP address. If not using the standard port 80, then it is necessary to also specify the port number.#processmaker virtual host
<VirtualHost your_ip_address >
ServerName "your_processmaker_domain"
DocumentRoot /opt/processmaker/workflow/public_html
DirectoryIndex index.html index.php
<Directory /opt/processmaker/workflow/public_html>
Options Indexes FollowSymLinks MultiViews
AddDefaultCharset UTF-8
AllowOverride All
Require all granted
ExpiresActive On
<IfModule mod_rewrite.c>
RewriteEngine On
RewriteCond %{REQUEST_FILENAME} !-f
RewriteRule ^.*/(.*)$ app.php [QSA,L,NC]
</IfModule>
#Deflate filter is optional. It reduces download size, but adds slightly more CPU processing:
AddOutputFilterByType DEFLATE text/html
</Directory>
</VirtualHost>
If your DNS or /etc/hosts has a defined domain for ProcessMaker, then use that domain for your_processmaker_domain. Otherwise, use the same IP address for your_processmaker_domain as was used for your_ip_address. For more information, see the Apache Virtual Hosts Documentation.
Note: It is also possible to define the virtual host for ProcessMaker directly in the Apache configuration by inserting the above VirtualHost definition in the file /etc/httpd/conf/httpd.conf.
Example 1:
ProcessMaker is installed in the /opt/processmaker directory and is running on a server at the address 192.168.1.100:
Code: Select all
Example 2:#processmaker virtual host
<VirtualHost 192.168.1.100>
ServerName "192.168.1.100"
DocumentRoot /opt/processmaker/workflow/public_html
...
ProcessMaker is installed in the /user/fred directory on your local machine at port 8080 with an dynamic IP assigned by DHCP:
Code: Select all
Example 3:Listen 8080
#processmaker virtual host
<VirtualHost *:8080 >
#don't include ServerName
DocumentRoot /user/fred/processmaker/workflow/public_html
...
ProcessMaker is installed in the /opt/pm3.0.1.7 directory at the IP address 123.45.67.89 and the domains www.example.com and any variant of X.example.com:
Code: Select all
Note that www.example.com and *.example.com need to be defined in the server's DNS or /etc/hosts file for this example to work correctly. #processmaker virtual host
<VirtualHost 123.45.67.89 >
ServerName "www.example.com"
ServerAlias "*.example.com"
DocumentRoot /opt/pm3.0.1.7/processmaker/workflow/public_html
...
After editing the httpd-vhosts.conf file, it is necessary to restart the Apache web server to use the new configuration:
Code: Select all
Step 7: Setting up ProcessMaker/etc/rc.d/rc.httpd restart
Once all ProcessMaker configurations were set up, open a web browser and enter the IP address (and port number if not using the default port 80) where ProcessMaker is installed. For instance, if ProcessMaker is installed at the address 192.168.10.100, then go to: http://192.168.10.100 or if it is installed locally at port 8080, go to: http://127.0.0.1:8080
Then follow the steps in the Installation Wizard in the web browser to complete the installation of ProcessMaker.
Step 8: Additional Configuration
Additional aspects of ProcessMaker may need to be configured. See Additional Server Configuration and the Administration section of the wiki. Most installations of ProcessMaker need to configure the following:
Setting the Time Zone
The default time zone for the ProcessMaker server can be set by logging into ProcessMaker with the "admin" user and going to Admin ] Settings ] System and setting the Time Zone. Another way to set the time zone is edit the env.ini configuration file.
Configuring Email
If planning on sending out email notifications or enabling users to recover forgotten passwords, then see Email - Settings to configure ProcessMaker to use an email server.
Execution of cron.php
If planning on using email notifications or timer events, then the server running ProcessMaker has to be configured to periodically execute the cron.php file. See Executing Cron Scripts.
Errors during Installation
If an error occurs during the installation, check the installation log file:
<install-directory>/shared/log/install_log.log
Depending on the errors found in the installation log file, check the following files:
The Apache configuration file:
/etc/httpd/conf/httpd.conf
The ProcessMaker web site configuration file for Apache:
/etc/httpd/conf.d/pmos.conf
The PHP configuration file:
/etc/php.ini
The MySQL configuration file:
/etc/my.cnf
The ProcessMaker configuration file where components are installed:
<install-directory>/workflow/engine/config/paths_installed.php
The ProcessMaker configuration file for database connections:
<install-directory>/shared/sites/workflow/db.php
The ProcessMaker redirection to login screen:
<install-directory>/processmaker/workflow/public_html/index.html
If the following error appears at the login screen:
If having other issues, please ask for help on our ProcessMaker forum.
 - By domnickfury
 - By Kiruthikaa